 You can interact with your Azure services using Microsoft Azure Restful APIs. However, to start sending commands and instructions, you must carry out several steps before you can interact with Azure.
On this, the last blog post of the year 2019, I will take you through the steps to set up the access to your Azure subscription and interact with it using the Azure Restful API.
This exercise is part of my new development of the MS Office 365 Backup Analysis tool. This new development is where I am going to add several features required to automate some steps to make the tool easier to be used.
Let’s get started:
Register an Azure Application
We will begin our configuration by creating an Azure Application. To do that, follow these steps:
- Browse to Azure Active Directory -> App registrations. Select +New Registration tab.
- Note: In this example, mvpoasis is the Azure Active Directory. You will have your own.
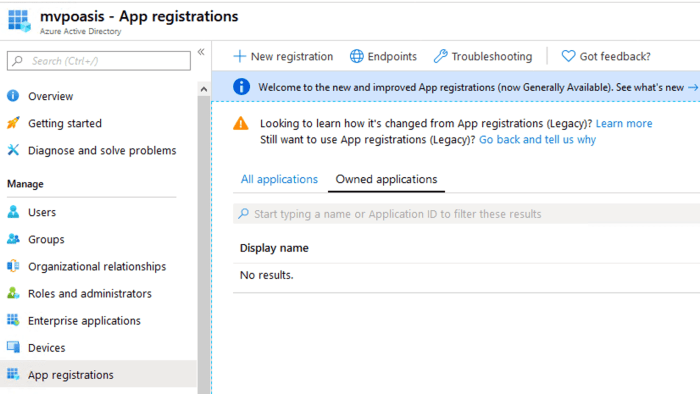
- Name the Application. In this example, it is MVP_Token. Next, at Supported account types, chose the radio button with the security configuration you require. Hit register.

- Later on, we need the Application (client) ID of the newly created application; we also are required to set a secret key. Therefore, at this point, copy the Application (client) ID.
Last thing on this screen, click on Certificate & secrets from the left side of the menu.

- On Certificates & secrets, press New Client Secret. Next, add a client secret, then follow by clicking on Add, and then copying the new created Value.

Note: the Value to be copied is in the lower right corner of the screenshot below.

Azure Access Permission
Now we are ready to provide a subscription level permission to our newly created Application. Browse to Azure Subscription. Chose your subscription, and then select Access Control (IAM)

Add the application as a contributor by pressing on the Add -> Add Role assignment
At Add role Assignment, select the following:
Role: Contributor.
Assign Access to: Azure AD user, group, or service principal.

Test Configuration
Let’s check to see if we can retrieve some information from the Azure Subscription we configured using those steps above.
I always like to start with Postman to make things easy before we hit the rocky road. So let’s prepare for the use of Postman by following these steps below:
- Refer to Microsoft documentation for more information regarding the permissions and the Azure Restful API command
- From the above, we will use a POST command to request a Token; the URL is: https://login.microsoftonline.com/<tenant id>/oauth2/token
- To obtain the Tenant ID to browse to Active Directory -> Application Registrations. Select the endpoint from the top menu; copy the Token endpoint v1 URL:

- Open Postman; create a new POST Request using the copied URL.
- On the Body, add the following:
grant_type : client_credentials
Client_id : <Copied ID>
client_secret: <Copied Client Secret>
resource: https://management.azure.com/
- When the request is run, a Token should be retrieved. Copy the Token, it is to be used for the next step:

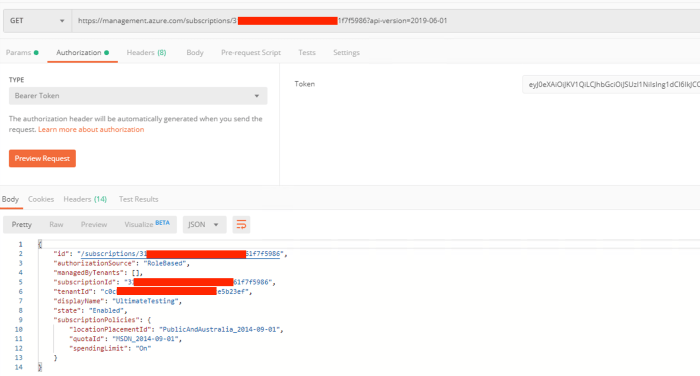
- Let’s try a GET command to retrieve the Azure Subscription Details. To retrieve the Azure subscription details, we will use the following GET command:
<GET https://management.azure.com/subscriptions/{subscriptionId}?api-version=2019-06-01>
Note 1: To learn more about using this command, browse to Microsoft Document
Note 2: You can acquire the subscription ID from Active Directory -> Properties -> Directory ID.
- From Postman, create a new Get Request and add.
- Add the GET URL; then modify with your subscription ID.
- Authentication: Bearer, then use the Token you copied previously.
Summary
On this blog post, I demonstrated how easy it is to set up an Azure Application, and to get started with the Azure Restful API. After you go through the steps above, you can start managing your Azure Subscription using APIs.
For me, I will be using these steps to implement two additional features on my community Office 365 Backup Analysis tool.
I hope this blog post was informative. Let’s catch up next year with more exciting topics.
