
Migrating workloads from on-premises to a public cloud is a task that requires lots of detailed planning and preparation. It’s a team effort where every workload owner must be involved and engaged to reduce any negative impacts on the workload, the migration process, and the business.
Last week, a friend of mine asked me the best and the easiest way to migrate a workload from on-premises to Microsoft Azure. As one who attended the Microsoft Ignite conference in Sydney a month ago, and the information is still fresh in my mind, I suggested using Microsoft Azure Migrate. This helps with migrating Virtual workloads running on Hyper-V or VMware, to Azure. This is in addition to a new capability that was introduced recently, the migration of workloads from physical servers., in preview at this point.
This blog post is an introduction to the Microsoft Azure Migrate tool.
Migration Framework
Before you begin your migration, you must make preparations. To simplify the discussion, I like to work around a simple migration framework. This is where I concentrate on three areas before I go ahead with any cloud migration. The three areas are:
- Assessment: Its a very important stage where you and all the application owners, including the business owners, get together to go through these items:
- Discovery stage, which includes application assessment, cost analysis, security requirements, and application dependency mapping.
- Roadmap stage, where you and the business owners group and prioritize the applications, discuss the design and architecture of each application, align with the cloud design, and then put this in-migration schedule.
- Migrate: When you complete the assessment stage, you will be ready to start the Migration phase which you can break it down to two stages:
- build, on this stage you will start experience the fun part of the migration as on this stage you will start to create the Azure environment and prepare for hosting the migrated workloads (creating and configuring resources group, network configuration, storage accounts and more).
- Replicate and integrate the workload using the agreed tool, on this blog post we agreed to use Azure ASR tool and attach to the services you built on the previous stage.
- Management: Finally, you start the Management stage of the migration workload on Microsoft Azure. Here, you fine-tune the migration workload to optimize the performance and cost.
Azure Migrate
Now that we have planned, and all agreed with the planned framework to be used, it is time to concentrate on the Microsoft Azure Migrate tool. We start with provisioning, then deployment, and then finally, the workload of the migration.
Using Azure Migrate
From Azure search, search for “Azure Migrate”, and Run.

Add Tool
After Azure Migrate has been located and started, choose the type of workload to be migrated; your options are Servers, SQL, and option to explore more scenarios:

On this blog post, let’s start with the option for Windows and Linux servers. After you click the assess and migrate server button, you are offered a Quickstart menu to discover, and then assess your target servers:

From the guided option, you start with the discovery process. Here, you can deploy a local appliance to perform the discovery process of your local workload; or alternatively, you can import the list of your workloads using a CSV file.
Let’s deploy the on-Premises appliance; this is a Windows VM that we can import to our virtual infrastructure.
Azure Migrate tools support VMware and Hyper-V virtual infrastructure, Also from the following screenshot, you can notice the new feature for the physical workload. (Not virtualised/Other, still in preview):

After downloading the Azure Migrate appliance, and importing the OVA (VMware), you can log in to the virtual machine (VM) and run the “Appliance configuration manager.” Follow the guided wizard to configure the appliance and discover your on-premise workload:

Note: Run the web GUI from within the appliance; if the web GUI did not start automatically, and you get a web error page (default port is 44368), check your IIS, port, and certificate, etc…
Assess
After the discovery process has completed, this will take some time, you can browse to, and review the discovered workload in preparation to assessing the next step:

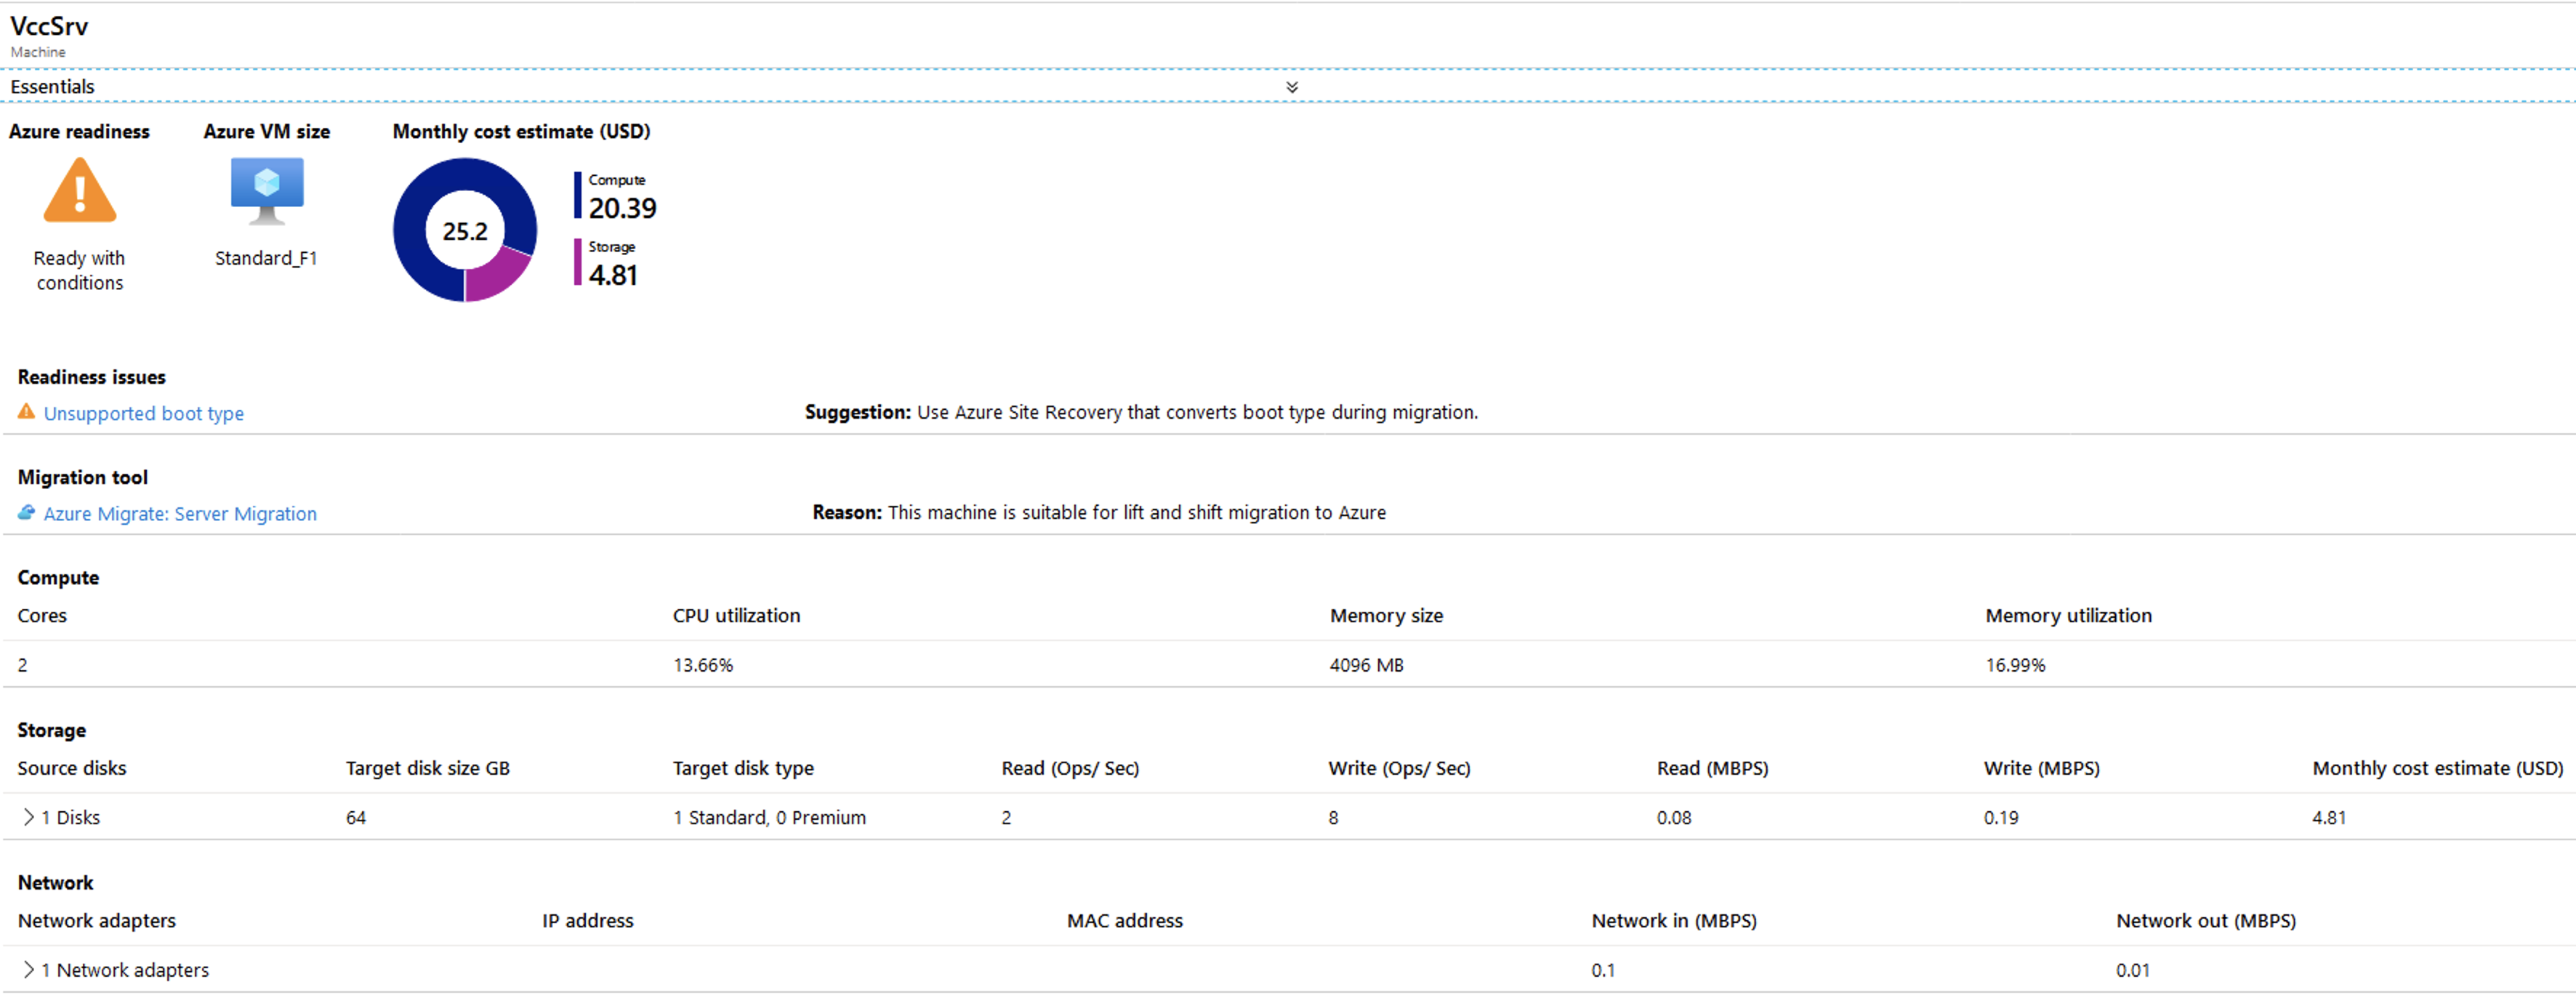
By clicking on the Assess option, and after configuring the Server assessment Group, you can learn about your workload, and how ready your workload is to migrate to Azure, and if there is any remediation that must be carried out before the migration can proceed. You can also review the virtual machine size, its cost, and more:
Replicate
Once you are happy with the Assessment, and you decide to begin the migration, you choose the Migration tool to perform the migration. To perform the migration, you must replicate the workload from on-premises to Azure. To accomplish this, you can use Azure Replication, if you don’t want to use a third party tool:
,
Note: you must create an assessment group to start the replication:

Then choose the target:

Compute

And press replication to start replicating the on-premise workload to the Azure cloud. The replication process can be monitored from the Migration tools, Replication servers:

To monitor the replication progress, press on Replication servers option:

Migrate
After the replication has completed, you can check the overall status of the replication before beginning the migration by pressing the overview option on the “Azure Migrate: Server Migration”:

By pressing on the overview option, you will be greeted with guided steps, like Test migration, before you migrate the workload. Also on this screen you can check the status of the replication jobs to ensure the jobs have succeeded, or failed.

Note, that you can test the workload before migrating by pressing the Test migration option. Here, you are connected to the virtual machine and have the opportunity to ensure the workload will behave as expected after the migration:

Conclusion
The Microsoft Azure Migrate tool is an easy way to complete migrations. I was surprised at the comprehensiveness and efficiency of the tool. Using the migration tool can help you implement the best migration strategy, starting with Discovering, Replicating and then Management, as described in the framework mentioned above. The best part of the tool is the cost analysis feature, where you can see the expected cost of running your workload on the cloud, avoiding cost surprises on your monthly expenditure.
