 Following many requests from service providers, partners, and customers, I would like to give you an insight into using Amazon S3 to store your backups for long retention periods or archiving.We will go step-by-step through the AWS (Amazon Web Services) Storage Gateway configuration to show you how to integrate with Veeam Backup and Replication.
Before we start, Amazon AWS S3 offers three types of S3 storage using the AWS Storage Gateway:
1. Gateway-Cached Volumes, allows you to store your data on S3 with keeping the frequently accessed data locally with Max size of 32 Tb with Max of 32 volumes, total size 1 PB.
2. Gateway-Stored Volumes, allow you to store your data locally with the option to sync the data as snapshots and store on S3 with Max size of 16 Tb, with 32 volumes, total 512 Tb.
3. Gateway-Virtual Tape Library (VTL), where you can store your data for archiving on S3 or Glacier with Max of 1500 v.tape with aggregated capacity of 1 PB.
Let’s go through the configuration steps of the Gateway-cached volumes and the VTL (Virtual Tape Library).
Scenario
To provide a real life example, I will consider the following requirements from a hypothetical customer wishing to use AWS S3 to backup. The customer will need:
- Data Size: 3 TB
- Change rate between backups: 2%
- Full: Weekly
- Backup method: Two weeks forward incremental
- Dedupe: 50%
- Onsite retention: Two weeks
- No local storage
Solution Building Blocks
- Veeam Backup and Replication software
- AWS Storage Gateway – Cached Volume
- AWS VTL Glacier
Calculations
Before starting with the deployment and configuration backup components, we will need to size our backup repository correctly. The sizing will focus on the local cache of the AWS Storage Gateway. So, let’s start by referring to the info we gathered from the scenario section:
Total Full Size: 1.5 TB
Incrementals: 45 GB
Total on site for two weeks: 4 TB
Download the AWS Storage Gateway
After sizing, we are ready to start our deployment. First, let’s complete the steps to download the AWS Storage Gateway:
1. Access the AWS portal, and then chose StorageGateway – Deploy a new Gateway.

2. Choose your preferred Gateway. In this example, we will use Gateway-Cached Volumes. With this option, we can keep frequently accessed data on the site, and the old data will be stored on S3. In our scenario, we decided to retain frequent access data on site for two weeks for quick restoration.
 3. Download the Storage Gateway
4. Size the upload buffer using the following formula:
(Application throughput (MB/s) -Network throughput to AWS (MB/s) X compression ratio) Duration of write (S) = upload buffer (MB).
Deploy the AWS Storage Gateway
On completing the download of the Storage Gateway appliance, import the .ovf file into your virtual centre (you can download the storage gateway for hyperV also).
-
- Use thick provisioning for better performance.

1. Important: Synchronize the Storage Gateway time.

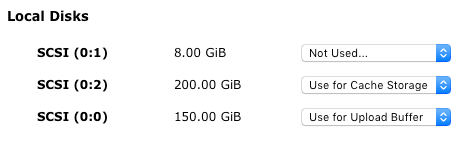
2. Add two disks to the appliance; one disk for the local storage, and the second disk for the upload buffer. In our example, the storage disk size is: 4TB for two weeks and the disk buffer size is 150GB.
Note 1 : On the screenshot below, we allocated 50GB for the storage and 5GB for the buffer.
Note 2: It is recommended that you allocate at least 20% of your existing file store size as cache storage, and also ensure that the cache storage is larger than the upload buffer.

3. Change the controller to VMware Paravirtual.

Activate the Storage Gateway:
On completing the importing and configuring of the local storage gateway, we follow the steps to activate it by going to the AWS portal, Storage Gateway.
1. Set up and Activate a New Gateway.

2. Setup the Buffer and Storage.

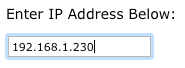
3. Enter the local IP Address, and then proceed with the Activation.
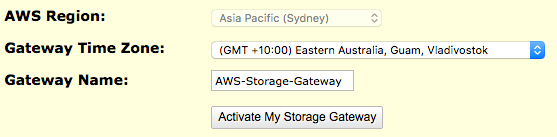
4. Enter the time zone and the gateway name, and then press Activate My Storage Gateway.
5. On completing the activation, you must create the volumes by selecting the new Storage Gateway from the list on the left hand side.

6. Create the volumes by pressing the button Create Volumes.

7. Assign the Volumes.
Note: The cache volume should be 1TB. In this example, we reduced the size due to a space restriction in the storage on the computer used for the screenshot.
8. If an alert is required, you can set the alarm.
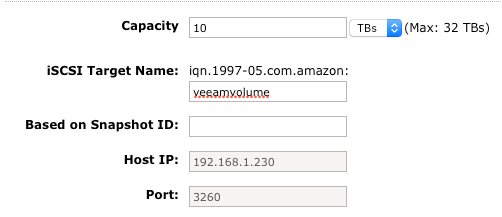
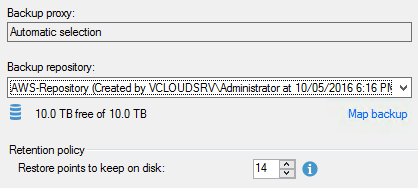
9. Allocate the size of the S3 Bucket. In this example, it is 10 TB.
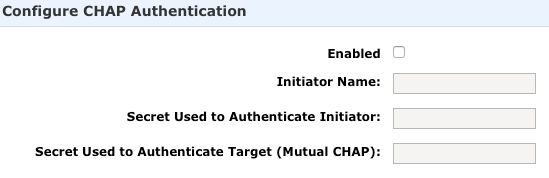
10. If the Optional CHAP Authentication is to be set, fill in the required fields.
Connect the AWS Storage Gateway to the Windows server:
Follow these steps to connect the AWS Storage Gateway to the Windows server:
1. Open the ISCSI initiator, and then enter the AWS Storage Gateway IP address to be connected.
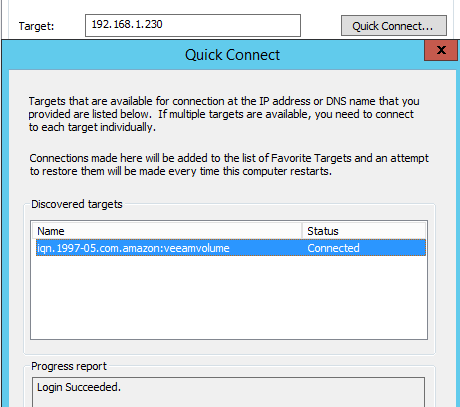
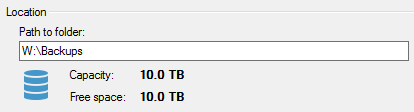
2. Activate and then format the new volume (10 TB) – (Drive letter W:)


Connect AWS Storage Gateway to Veeam Backup as a Repository
Follow the steps below:
1. Open the Veeam backup console.
2. Browse to the backup infrastructure option.

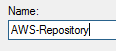
3. Add the Repository

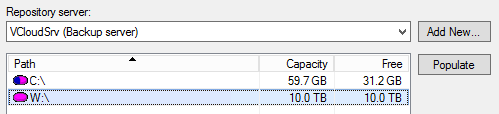
4. Chose Microsoft Windows server as a repository type

5. Choose the volume you just created that is connected to the storage gateway. In our example. it is drive W:.
6. Create a backup Folder; or, keep the default “Backups” folder
7. Tick the checkbox for Use per-VM backup files. This configuration maximises performance. Creating a backup file as per VM reduces the restore complexity, and improves storage performance.

8. Setup the Load control
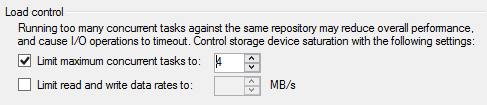
Note: The maximum upload speed is 120MB/s, and maximum download speed is 20MB/s. These numbers are achieved with sequential write at 256KB I/Os.
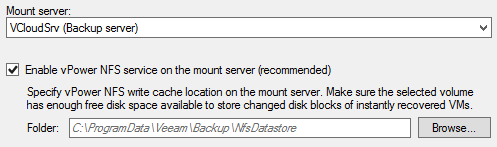
9. Enable vPower if necessary.
Note: If the data not present in the cache, then the storage gateway will download it from AWS S3; this will incur a charge cost.
Veeam Backup Job Testing
Complete these steps to test the Veeam Backup Job:
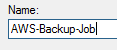
1. Create a new backup job.
Note: It is recommended that if S3 is backing up data for long retention, use a copy job.
2. Chose the VM you wish to backup

3. Select the S3 Repository
4. Create and run the job. As this is a test job, we will skip the application processing and scheduling, and will keep the default values.
Estimating the Cost
Let’s review the expected monthly cost of the solution. The table below lists the estimated cost of the 4GB we calculated for the example customer.
Components |
Cost – $ |
Total |
|
Estimation of for 3 TB |
||
| Virtual appliance |
125 |
125 |
| Storage Gateway |
0.033 |
0.132 |
| Data Transfer in |
0 |
0 |
|
Data Transfer out |
> 1Gb < 10Gb = 0.140 |
0.42 |
Conclusion
As you can see from the example just completed, the process to deploy the solution is straightforward. This customer discussed above decided that the requirement was to not use local storage. All the backup must be stored in the cloud; we recommend there is a have a local storage where you can backup locally, and then use the backup copy job to store the old data on the S3.
Also, things to be aware of:
- Cost out – Veeam has to read from the S3 to structure the data; this will increase the cost of data out, and is one reason to think about using S3 as an archive target)
- Bandwidth consumption.
- Longer recovery time.
On the next post, we will go through the AWS Storage VTL for offsite archiving, and discuss how Veeam backup and replication can be integrated with this solution.

Hi Lee, i’m not aware of anything coming in the near future, but as you know Veeam, they always surprising their customers.
LikeLike