
What does it take to create and configure the Azure Static web app? Learn how to modify your JSON file to avoid multiple CI/CD build errors and modify your workflow to run manually.
The Azure static web app comes with many benefits. It helps companies to speed up the delivery of web app services; but during my work with this technology, I encountered several challenges. In this blog I hope to help you solve these issues during your testing or service delivery.
The challenge
In this blog I will share the solutions to the two challenges I encountered during my work with the Azure Static Web app:
- CI/CD build fail (“The app build failed to produce artifact folder: ‘out’. Please ensure this property is configured correctly in your workflow file.”)
- Website update on any modification of the code
Before we start, let’s check how easy it is to Deploy Azure Static Web App.
Deploy the Static App Service
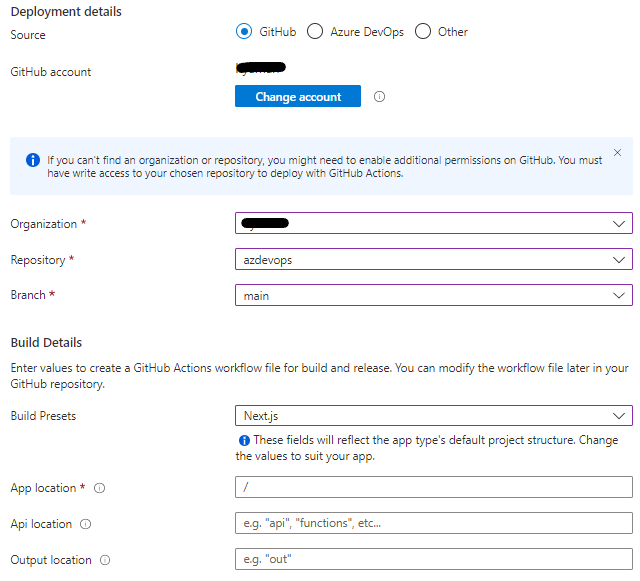
To get started, you have to deploy the Static Web app service. The process is as simple as the following process:
a. From the Azure Market place, search for “Azure Static Web App”
b. Create the Static Web app, then supply all the information for your configuration:
c. After the Static web app has been created, check the GitHub repository to confirm that the workflows directory and the yaml file have been created.
Modify the JSON file to avoid CI/CD push issues
After the first upload of your files, the CI/CD process will fail. To avoid this build issue, add/modify the below following line to the package.json file:
"build": "next build", to "build": "next build && next export"
Upload and publish your code
Each time you modify or upload a file in your GitHub repository, the workflow will run automatically and upload your code. If you require a manual trigger of the workflow, there are two types of actions you can use to achieve this:
workflow_dispatch: allows you to run a specific workflow event.repository_dispatch: will enable you to trigger all workflows on the repository.
Note: Static Web app allows only one workflow, repository_dispatch
On your YAML workflow file, add the following line:
on:
  push:
    branches:
      - master
  pull_request:
    types: [opened, synchronize, reopened, closed]
    branches:
      - master
  repository_dispatch:
Conclusion
Using a Static Web app is an easy way to publish your web app without spending too much time with other configurations, such as website certificates. When the Static Web app is created, the certificate is automatically created and renewed when needed, leaving you to focus on delivering your services.
